
Introduction
Chicken tenders have long been a beloved comfort food, cherished by kids and adults alike. Their tender and juicy meat, paired with a satisfying crunch, makes them a favorite choice for lunch, dinner, or even a snack. However, traditional fried chicken tenders can be high in calories and unhealthy fats, prompting many to seek a healthier alternative. Enter the crispy baked chicken tenders: a delicious option that retains all the flavor and crunch without the guilt. This recipe stands out for its unique features, including a buttermilk marinade that ensures flavor and tenderness, as well as a flavorful coating that delivers the perfect crunch.
Ingredients
– 1 pound chicken breast tenders
– 1 cup buttermilk
– 1 cup all-purpose flour
– 1 cup panko breadcrumbs
– 1/2 cup grated Parmesan cheese
– 1 teaspoon garlic powder
– 1 teaspoon onion powder
– 1 teaspoon smoked paprika
– 1/2 teaspoon cayenne pepper
– Salt and pepper to taste
– Cooking spray or olive oil for baking
Instructions
1. Marinate the Chicken: In a large bowl, combine the chicken tenders and buttermilk. Ensure all pieces are submerged. Cover and refrigerate for at least 1 hour, or overnight for maximum tenderness.
2. Preheat the Oven: Preheat your oven to 425°F (220°C) and line a baking sheet with parchment paper or lightly grease it with cooking spray.
3. Prepare the Coating: In one bowl, mix the flour with salt, pepper, garlic powder, onion powder, smoked paprika, and cayenne pepper. In another bowl, combine the panko breadcrumbs with grated Parmesan cheese.
4. Coat the Chicken: Remove the marinated chicken from the buttermilk, allowing excess to drip off. Dredge each piece first in the seasoned flour, shaking off any excess, then dip it back into the buttermilk, and finally coat it with the panko mixture, pressing gently to adhere.
5. Arrange for Baking: Place the coated chicken tenders on the prepared baking sheet. Lightly spray the tops with cooking spray or drizzle with a little olive oil to promote browning.
6. Bake: Bake in the preheated oven for 20-25 minutes or until the tenders are golden brown and cooked through, reaching an internal temperature of 165°F (75°C).
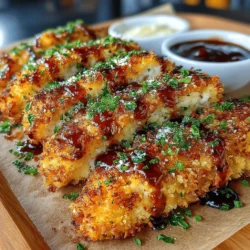
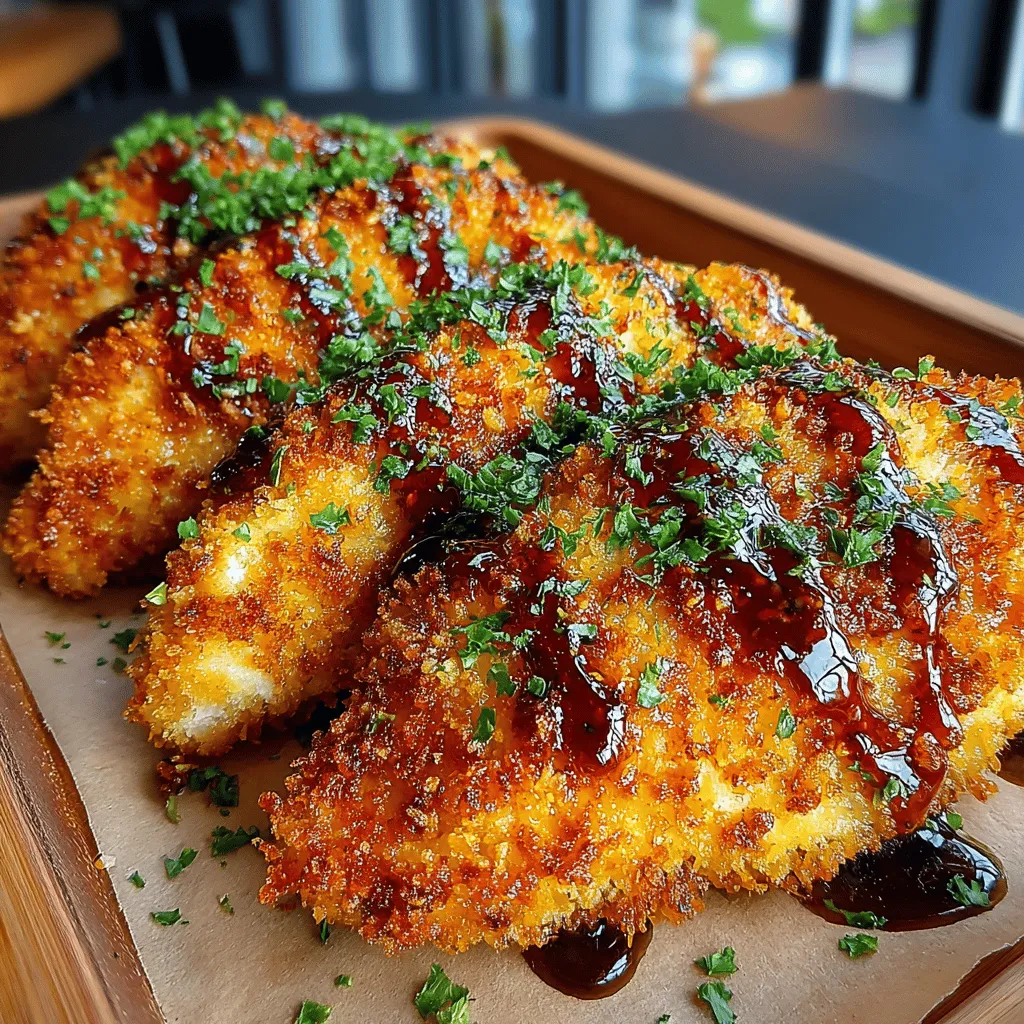
7. Serve: Allow the chicken tenders to cool slightly before serving. Enjoy with your favorite dipping sauces.
Understanding the Ingredients
Chicken Breast
The choice of chicken breast is crucial for this recipe. Chicken tenders, which are the tender meat from the underside of the chicken breast, provide a lean protein option that cooks quickly and remains juicy when prepared correctly.
Buttermilk
Buttermilk plays a vital role in marinating the chicken. Its acidity helps to tenderize the meat while infusing it with flavor. The result is chicken that is not only flavorful but also incredibly moist.
Flour and Breadcrumbs
The combination of flour and breadcrumbs creates the perfect coating for the chicken. Flour acts as a base layer that helps the breadcrumbs adhere better, while the breadcrumbs provide the desired crunch. Panko breadcrumbs, in particular, offer a lighter, airier texture, yielding an extra-crispy finish.
Parmesan Cheese
Adding grated Parmesan cheese to the breadcrumb mixture enhances the flavor profile of the chicken tenders. It contributes to the crunchiness as well, creating a golden crust that is both savory and satisfying.
Spices
The spices used in this recipe—garlic powder, onion powder, smoked paprika, and cayenne pepper—are essential for elevating the flavor of the chicken tenders. They create a balanced taste, providing warmth and depth without overwhelming the dish.
Preparation Steps for Perfect Chicken Tenders
Marinating the chicken in buttermilk is a critical step that cannot be overlooked. This process not only imparts flavor but also helps to break down the proteins in the chicken, leading to a tender and juicy result.
Creating the perfect flour coating involves seasoning the flour adequately, ensuring that the chicken is flavorful from the inside out.
When crafting the breadcrumb mixture, consider the benefits of using panko over regular breadcrumbs. Panko is larger and more irregularly shaped, which allows for more air pockets that contribute to a light and crispy texture.
Breading Technique for Optimal Crispiness
The breading process is where the magic happens. Start by dredging each chicken tender in the seasoned flour to create a base layer. This step is crucial as it allows the buttermilk to stick better to the chicken, which in turn helps the breadcrumb coating adhere more effectively. After dredging, dip the chicken tenders back into the buttermilk before coating them in the panko mixture. This double-dipping technique ensures a thicker, crunchier crust that holds up beautifully during baking.
Follow these steps carefully, and you’ll achieve perfectly crispy baked chicken tenders that are sure to be a hit with everyone at the table.
Tips for Achieving Perfectly Crispy Chicken Tenders
Importance of Pressing Breadcrumbs
To achieve a superior texture in your crispy baked chicken tenders, it’s essential to press the breadcrumbs onto the chicken. This technique not only ensures that the breadcrumbs adhere better but also creates a thicker, crunchier coating. Use the palm of your hand to press down firmly on the breadcrumbs after coating each tender. This extra step prevents the crumbs from falling off during baking, resulting in a more satisfying crunch.
Role of Cooking Spray or Olive Oil
Using cooking spray or a light drizzle of olive oil is crucial for achieving that golden, crispy finish. These fats help to promote even browning and enhance the flavor of the chicken tenders. Make sure to lightly spray or coat the tenders before baking, as this will create a barrier that helps the breadcrumbs crisp up beautifully in the oven.
Baking the Chicken Tenders
Preheating the Oven and Preparing the Baking Sheet
Before you start baking, preheat your oven to 400°F (200°C). This temperature is ideal for achieving crispy chicken without drying it out. Additionally, line your baking sheet with parchment paper or a silicone mat to prevent sticking and make cleanup easier.
Importance of Proper Oven Temperature
A properly preheated oven is crucial for achieving the desired texture. If the oven is not hot enough, the chicken tenders may end up soggy rather than crispy. The high heat allows the moisture to evaporate quickly, resulting in a tender interior and a crunchy exterior.
Arranging Chicken Tenders on the Baking Sheet
When placing the chicken tenders on the baking sheet, make sure to arrange them in a single layer with enough space between each piece. This spacing is vital as it allows hot air to circulate around the tenders, promoting even cooking and preventing steaming, which can lead to sogginess.
Baking Tips for Golden Brown Tenders
For perfectly golden brown chicken tenders, bake them for approximately 20-25 minutes. Keep an eye on them as baking times may vary based on thickness. If you want an extra crispy finish, consider broiling them for the last 2-3 minutes of cooking, but watch closely to avoid burning.
Flipping for Even Crispiness
Halfway through the baking process, be sure to flip the chicken tenders. This step is essential for achieving even crispiness on both sides. Use tongs to carefully turn each piece, ensuring that they cook uniformly and develop a delightful texture all around.
Serving Suggestions and Pairings
Recommended Dipping Sauces
To elevate your crispy baked chicken tenders, pair them with a selection of dipping sauces. Classic choices include honey mustard, ranch dressing, and barbecue sauce. Each sauce complements the tender’s flavor and adds an extra layer of deliciousness.
Complementary Side Dishes
Consider serving your chicken tenders with sides that enhance the meal. Healthy options like fresh salads, steamed vegetables, or sweet potato fries not only provide balance but also add a pop of color to your plate. These sides are nutritious and make for a well-rounded meal.
Nutritional Benefits of Baked Chicken Tenders
Baked vs. Fried Chicken Tenders
One of the significant advantages of baking chicken tenders instead of frying them is the health benefits that come with it. Baked chicken tenders contain lower fat content and fewer calories, making them a healthier choice while still satisfying your cravings.
Overview of Protein Content and Nutrients
Chicken tenders are a great source of protein, which is essential for muscle repair and overall health. Baked chicken tenders retain essential nutrients, and when paired with healthy sides, they can contribute significantly to a balanced diet.
Dietary Considerations
For those with dietary restrictions, baked chicken tenders can easily be adapted. Use gluten-free breadcrumbs for a gluten-free version or substitute dairy ingredients with alternatives to accommodate dairy-free diets. This versatility makes the dish more inclusive for family and friends.
Conclusion
Making crispy baked chicken tenders at home is a rewarding experience that brings joy to both the cook and the diners. With the right techniques and tips, you can create a delicious dish that appeals to all ages. Don’t hesitate to explore different variations and pairings based on your preferences, ensuring that every meal is a delightful experience. Whether for a weeknight dinner or a family gathering, crispy baked chicken tenders are sure to be a hit.