Introduction
No-bake desserts have captured the hearts of dessert lovers everywhere, offering a simple and hassle-free approach to satisfying sweet cravings without the need for an oven. These delightful treats are perfect for warm summer days or when you’re short on time but still want to impress friends or family with a homemade indulgence. Among the plethora of no-bake options, one recipe stands out for its rich flavor and creamy texture: Creamy Dreamy No-Bake Peanut Butter Cups.
This delectable treat combines the irresistible flavors of peanut butter and chocolate, creating a snack that is both indulgent and surprisingly healthy. Made with wholesome ingredients, these peanut butter cups cater to a variety of dietary preferences while still delivering that classic candy bar taste. Whether you are looking to satisfy a sweet tooth or simply want a quick and easy dessert, this recipe provides the perfect balance of taste and nutrition.
In this article, we’ll explore the key ingredients that make these peanut butter cups a standout choice, and we’ll walk you through the initial steps to create this scrumptious treat in your own kitchen.
Understanding the Key Ingredients
Creamy Peanut Butter: The Star Ingredient
At the heart of this recipe lies creamy peanut butter, which not only serves as the primary flavor but also provides a host of nutritional benefits. Natural peanut butter, made from ground peanuts without added sugars or hydrogenated oils, is a fantastic source of protein, healthy fats, and essential nutrients such as vitamin E, magnesium, and potassium. Its rich and nutty flavor profile enhances the overall taste of the peanut butter cups, making each bite a delightful experience.
Using natural peanut butter also allows you to control the ingredient quality, steering clear of unhealthy additives that can detract from the health-conscious appeal of this treat. With its luscious creaminess and ability to blend seamlessly with other ingredients, peanut butter is undoubtedly the star of this no-bake dessert.
Coconut Oil: A Healthy Fat Choice
Another essential ingredient in this recipe is coconut oil, which plays a crucial role in achieving the desired texture for the peanut butter cups. When melted, coconut oil adds a velvety smoothness that helps bind the ingredients together while providing a healthy fat source. Unlike many other oils, coconut oil is rich in medium-chain triglycerides (MCTs), which may offer potential health benefits, including improved metabolism and energy levels.
In addition to its health advantages, coconut oil contributes a subtle sweetness and tropical flavor that complements the peanut butter beautifully. This makes it an ideal choice for those looking to create a dessert that is both delicious and nourishing.
Sweeteners: Honey vs. Maple Syrup
To sweeten the peanut butter cups, you have two excellent options: honey and maple syrup. Both sweeteners offer distinct flavors and health benefits, making them suitable for different dietary preferences.
Honey, a natural sweetener with antimicrobial properties, adds a rich and floral sweetness that pairs exceptionally well with peanut butter. It is also known for its antioxidant content, which can provide additional health benefits. However, honey is not suitable for vegans.
On the other hand, maple syrup is a vegan-friendly alternative that brings a unique caramel-like flavor to the mix. It is rich in minerals like manganese and zinc and has a lower glycemic index than some other sweeteners, making it a smart choice for those mindful of blood sugar levels. Choosing between honey and maple syrup ultimately depends on your personal taste and dietary restrictions, but either option will work beautifully in this recipe.
Vanilla Extract and Salt: Enhancing Flavor
To elevate the overall flavor of your Creamy Dreamy No-Bake Peanut Butter Cups, the addition of pure vanilla extract and a pinch of salt is essential. Vanilla extract lends a warm and aromatic note that complements the peanut butter, enhancing its natural flavor. It also adds depth to the sweetness, making the treat more satisfying.
Salt, on the other hand, is a powerful flavor enhancer that balances sweetness and brings out the richness of the peanut butter and chocolate. A small amount of salt can make a significant difference in the overall taste profile, ensuring that your peanut butter cups are both flavorful and well-rounded.
Dark Chocolate Chips: Richness and Vegan Options
No peanut butter cup would be complete without a generous coating of chocolate, and dark chocolate chips are the perfect choice for this recipe. Dark chocolate offers a rich and indulgent flavor while providing health benefits such as antioxidants and heart-healthy compounds. When selecting dark chocolate, look for varieties that contain at least 70% cocoa for maximum nutritional value.
For those following a vegan diet or looking to avoid dairy, there are plenty of delicious dairy-free dark chocolate options available. These alternatives allow you to enjoy the same rich flavor without compromising dietary preferences. The chocolate coating not only adds a decadent finish to the peanut butter cups but also creates a delightful contrast to the creamy filling.
Step-by-Step Guide to Making No-Bake Peanut Butter Cups
Preparation Phase: Getting Ready
Before diving into the delicious process of making Creamy Dreamy No-Bake Peanut Butter Cups, it’s important to prepare your workspace and gather all necessary ingredients. Start by lining a muffin tin or cupcake pan with paper liners. This will make it easy to remove the peanut butter cups once they have set. Having everything ready and organized will streamline the process and allow you to focus on creating these delightful treats.
Creating the Peanut Butter Mixture
Once your workspace is ready, it’s time to whip up the creamy peanut butter filling. In a mixing bowl, combine the creamy peanut butter, melted coconut oil, and your chosen sweetener (honey or maple syrup). Be sure to measure the ingredients accurately for the best results. Using a spatula, mix the ingredients together until you achieve a smooth and homogeneous consistency. If desired, add a splash of vanilla extract and a pinch of salt to enhance the flavor profile further. The result should be a luscious peanut butter mixture that is just the right balance of sweetness and creaminess.
Melting the Chocolate: Techniques
Now it’s time to prepare the chocolate coating that will envelop your peanut butter cups. There are two effective methods for melting chocolate: the microwave and the double boiler.
For the microwave method, simply place your dark chocolate chips in a microwave-safe bowl. Heat in short bursts of 15-30 seconds, stirring in between, until the chocolate is fully melted and smooth. Be cautious not to overheat, as chocolate can burn easily.
Alternatively, you can use the double boiler method, which is ideal for more controlled melting. Fill a saucepan with a couple of inches of water and bring it to a simmer. Place a heatproof bowl over the saucepan, ensuring that the bottom of the bowl does not touch the water. Add the chocolate chips to the bowl and stir gently as they melt, allowing for even heating.
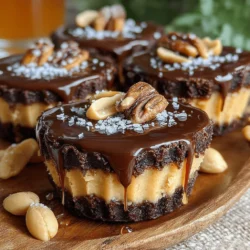
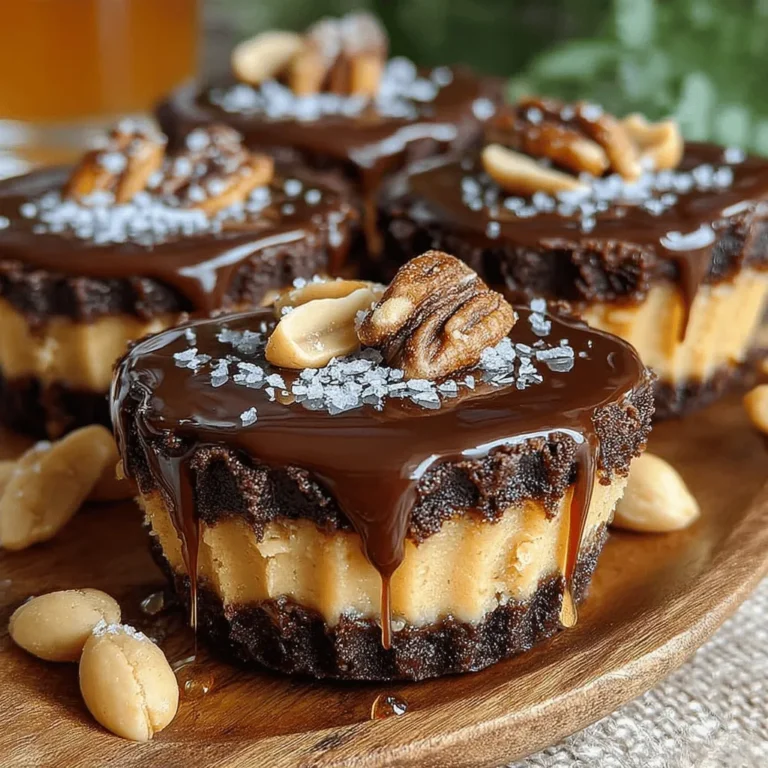
Once the chocolate is melted and silky, you will be ready to assemble your Creamy Dreamy No-Bake Peanut Butter Cups. The combination of the creamy peanut butter filling and the rich chocolate coating will create a treat that is sure to become a favorite in your household. Stay tuned for the next part of this article, where we will guide you through the final steps of making these irresistible peanut butter cups!
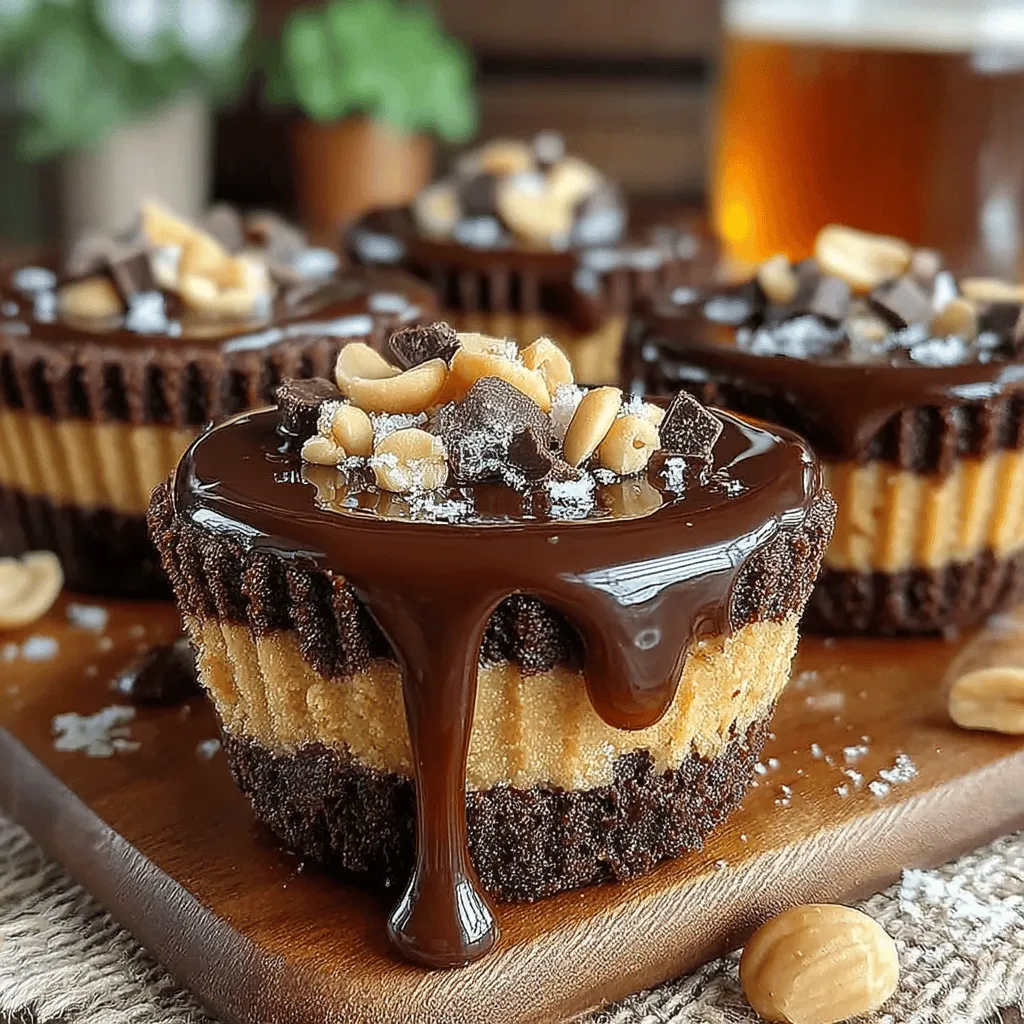
Assembling the Peanut Butter Cups
Assembling your Creamy Dreamy No-Bake Peanut Butter Cups is a delightful process that showcases the perfect balance of flavors and textures. Start by ensuring that your melted dark chocolate mixture is ready and that your peanut butter filling is well-mixed and creamy.
Step-by-Step Assembly
1. Prepare Your Molds: Use silicone muffin cups or a mini muffin tin lined with paper liners. These will allow you to easily remove the peanut butter cups once they are set.
2. First Layer of Chocolate: Spoon approximately one tablespoon of melted dark chocolate into each mold. Gently tilt the mold to ensure the chocolate evenly coats the bottom. This layer should be thick enough to support the filling but not so thick that it overwhelms the peanut butter flavor.
3. Chill the Bottom Layer: Place the molds in the freezer for about 10-15 minutes, or until the bottom layer of chocolate is firm to the touch. This step is crucial as it gives the peanut butter filling a solid base to rest on.
4. Add the Peanut Butter Filling: Once the chocolate layer is set, remove the molds from the freezer. Spoon about one tablespoon of the creamy peanut butter filling into each mold, being careful not to touch the edges with the filling. This will help maintain a clean layer for the top chocolate layer.
5. Top Layer of Chocolate: Pour another tablespoon of melted dark chocolate over the peanut butter filling in each mold. Again, ensure that the chocolate fully covers the filling, sealing it in and creating that luscious, two-layered look.
6. Final Chill: Return the molds to the freezer for an additional 30 minutes, or until the top layer of chocolate is completely set. The chilling process allows all flavors to meld together and improves the overall texture.
Emphasizing Texture and Layering
The beauty of these peanut butter cups lies in their texture. The creamy, smooth peanut butter filling perfectly contrasts with the rich, slightly crisp chocolate exterior. By taking the time to layer the chocolate and peanut butter properly, you enhance the overall experience of each bite. When assembled correctly, the chocolate should snap delightfully when bitten into, revealing the soft, dreamy peanut butter center.
Chilling and Setting: The Final Touch
Chilling your Peanut Butter Cups is not just a matter of time; it is a critical step in achieving the right consistency and flavor. The chilling process allows the chocolate to harden, ensuring that the cups hold their shape when removed from the molds. Additionally, giving the peanut butter filling time to cool and set allows the flavors to deepen, creating a more satisfying treat.
Chilling Times:
– First Layer: 10-15 minutes
– Peanut Butter Filling: No additional chilling is required between layers.
– Final Layer: 30 minutes or until completely set
Patience is key in this step. If you remove the cups too early, they may not hold together well when you try to eat them, leading to a messy experience.
Nutritional Benefits of the Creamy Dreamy Peanut Butter Cups
Now that your delectable treats are ready, let’s explore the nutritional benefits that make these Peanut Butter Cups not just a guilty pleasure but a healthier indulgence.
Healthy Fats and Protein in Peanut Butter
Peanut butter is a powerhouse of nutrition. Rich in healthy monounsaturated fats, it supports heart health and helps reduce bad cholesterol levels. Additionally, peanut butter is an excellent source of protein, which is essential for muscle repair and growth. Just two tablespoons of peanut butter can provide around 8 grams of protein, making these peanut butter cups a satisfying treat that can help curb hunger.
Furthermore, peanut butter contains vital nutrients such as vitamin E, magnesium, and potassium, contributing to overall health and wellness. The combination of healthy fats and protein makes these cups an ideal snack for anyone looking to maintain energy levels throughout the day.
Natural Sweeteners and Their Impact
In this recipe, we use natural sweeteners like honey or maple syrup to add just the right amount of sweetness without overwhelming the peanut butter’s natural flavor.
– Honey: Honey is known for its antioxidant properties, and it can help soothe sore throats and improve digestion. It contains vitamins and minerals, making it a healthier alternative to refined sugars.
– Maple Syrup: On the other hand, maple syrup is rich in antioxidants and minerals like zinc and manganese, which are important for maintaining a healthy immune system. It has a lower glycemic index compared to regular sugar, meaning it can help maintain stable blood sugar levels.
A quick comparison reveals that both sweeteners offer unique health benefits, making your peanut butter cups not only delicious but also a smarter choice compared to treats made with refined sugars.
Antioxidants in Dark Chocolate
Dark chocolate, the star of our recipe, is not only rich in flavor but also packed with antioxidants known as flavonoids. These compounds are linked to a variety of health benefits, including improved heart health, better blood flow, and reduced inflammation. The higher the cocoa content, the more antioxidants it contains.
In moderation, dark chocolate can also enhance brain function, improve mood, and provide essential minerals like iron, magnesium, and copper. By using dark chocolate in your peanut butter cups, you are not only treating your taste buds but also your body.
Serving Suggestions and Pairings
How to Serve Your Peanut Butter Cups
Once your Creamy Dreamy No-Bake Peanut Butter Cups are set, it’s time to serve them! Here are a few creative ideas for presentation:
1. Platter Display: Arrange the peanut butter cups on a beautiful serving platter, garnished with fresh berries or a sprinkle of sea salt for an elegant touch.
2. Individual Wrapping: For a party or gathering, wrap each cup in colorful foil or parchment paper to create a fun gift-like presentation that guests can take home.
3. Dessert Bars: Serve the peanut butter cups as part of a dessert bar alongside fresh fruits, nuts, and other treats. This creates a delightful spread that caters to different tastes.
Pairing Ideas for a Complete Treat Experience
To elevate your snacking experience, consider pairing your peanut butter cups with beverages or other desserts:
– Beverages: A glass of cold almond milk, a warm cup of coffee, or even a sweet herbal tea pairs wonderfully with the rich flavor of the peanut butter cups. For a special treat, try a chocolate-flavored smoothie or a milkshake.
– Complementary Desserts: Offer a selection of fruits like bananas, strawberries, or apple slices for a fresh contrast. Cheesecake bites or brownies can also make fantastic companions for a dessert platter.
By thoughtfully pairing your treats, you can create a memorable experience that impresses family and friends.
Storing and Shelf Life of No-Bake Peanut Butter Cups
Proper Storage Techniques
To keep your Creamy Dreamy No-Bake Peanut Butter Cups fresh and delicious, proper storage is essential. Here are some tips:
– Refrigeration: Store the peanut butter cups in an airtight container in the refrigerator. This will help maintain their texture and keep them from melting.
– Freezing: If you want to make a larger batch, these cups freeze beautifully. Just ensure they are individually wrapped or placed in a freezer-safe container. They can last up to three months in the freezer.
Shelf Life and Signs of Spoilage
When stored correctly, your peanut butter cups can last in the refrigerator for about one week. If they begin to develop a strange odor or a change in texture, it’s best to err on the side of caution and discard them. Always check for any signs of spoilage, especially if you notice any discoloration or mold.
Conclusion
Making Creamy Dreamy No-Bake Peanut Butter Cups is not only simple but also a rewarding experience that results in a delicious treat everyone will love. With the perfect balance of creamy peanut butter, rich dark chocolate, and a touch of natural sweetness, these cups are an excellent choice for satisfying your sweet tooth without compromising your health goals.
Whether you enjoy them as an afternoon snack, a dessert at gatherings, or a delightful treat to share with loved ones, this recipe aligns perfectly with healthier eating habits. So, gather your ingredients and try your hand at these delectable treats; you won’t be disappointed!