Oreo Delight: No-Bake Ice Cream Pie Recipe
Introduction
In the world of desserts, no-bake recipes have surged in popularity, and it’s easy to see why. They offer a perfect solution for those hot summer days when turning on the oven feels like the last thing you want to do. Among the myriad of options, the Oreo Delight: No-Bake Ice Cream Pie stands out as an exceptional choice, combining the beloved flavors of chocolate and cream to create a dessert that’s both indulgent and refreshing. Whether you’re hosting a summer barbecue, celebrating a birthday, or simply treating yourself on a warm afternoon, this pie is guaranteed to impress.
What makes this dessert even more appealing is its simplicity. With just a handful of ingredients and minimal preparation time, even novice bakers can achieve stunning results. The creamy texture of vanilla ice cream blended with crunchy Oreo cookies creates a delightful contrast that is hard to resist. As you dig into each slice, the rich chocolate flavor mingles with the cool creaminess, making it an unforgettable experience.
The Allure of No-Bake Desserts
No-bake desserts are a category all their own, defined by their convenience and adaptability. Unlike traditional baked goods, these recipes require little to no cooking, allowing you to whip up something delicious without the stress of managing oven temperatures or baking times. This makes them especially appealing during the hotter months when you want to enjoy a sweet treat without heating up your kitchen.
One of the significant benefits of no-bake desserts is their time-saving nature. Many no-bake recipes can be prepared in under an hour, and the only waiting you might need to do is for them to chill in the refrigerator. This makes them ideal for last-minute gatherings or spontaneous celebrations. Plus, their versatility means they can be tailored to suit various occasions, from casual family dinners to elegant parties.
The Oreo Delight pie exemplifies this versatility. It can be dressed up with decorative toppings for a festive occasion or kept simple for a laid-back dessert after dinner. The no-bake nature of this recipe also means that you can experiment with flavors and textures, ensuring that your dessert is uniquely yours while still being incredibly easy to make.
Ingredients Breakdown for Oreo Delight
To create the perfect Oreo Delight, you’ll need a selection of essential ingredients that work together to deliver the delightful flavor and texture this dessert is known for. Here’s a breakdown of what you’ll need and the role each ingredient plays:
– Oreo Cookies: These classic chocolate sandwich cookies serve as both the base for the pie crust and a flavor anchor for the entire dessert. Their crunchy texture adds a satisfying contrast to the creamy filling.
– Unsalted Butter: Used to bind the crushed Oreos together, unsalted butter helps create a cohesive pie crust that holds its shape while providing a rich flavor.
– Vanilla Ice Cream: The star of the filling, vanilla ice cream adds a creamy and sweet component. Its smooth consistency makes it easy to spread and ensures that each slice of pie is luscious.
– Heavy Whipping Cream: This ingredient is crucial for adding lightness and richness to the dessert. When whipped, it increases in volume and creates a fluffy texture that complements the dense ice cream.
– Powdered Sugar: While primarily used to sweeten the whipped cream, powdered sugar also helps stabilize it, ensuring that your dessert maintains its shape once assembled.
– Chocolate Fudge Sauce: This indulgent addition elevates the flavor profile, providing a rich chocolatey element that perfectly balances the sweetness of the ice cream and the crunch of the cookies.
– Garnish Options: While optional, adding garnishes such as crushed Oreos, whipped cream dollops, or chocolate shavings can enhance both the visual appeal and taste of your pie, making it even more inviting.
Step-by-Step Instructions for Creating Oreo Delight
Now that you have a thorough understanding of the ingredients and their purposes, it’s time to dive into the preparation process. Follow these step-by-step instructions to create your own Oreo Delight: No-Bake Ice Cream Pie.
Step 1: Prepare the Crust
Start by crushing about 24 Oreo cookies into fine crumbs. You can do this by placing them in a food processor or putting them in a zip-top bag and using a rolling pin to crush them. Aim for a texture similar to sand, where there are no large chunks remaining. Once crushed, transfer the Oreo crumbs to a mixing bowl and add melted unsalted butter. Mix until the crumbs are evenly coated and resemble wet sand.
Step 2: Form the Crust
Press the Oreo crumb mixture firmly into the bottom and up the sides of a 9-inch pie pan. Use the back of a measuring cup or your fingers to ensure the crust is tightly packed and even. Once you have an even layer, place the crust in the refrigerator to set while you prepare the filling.
Step 3: Make the Filling
In a large mixing bowl, scoop out about 2 cups of softened vanilla ice cream. Allow it to sit at room temperature for a few minutes to soften further, making it easier to mix. In a separate bowl, pour in 1 cup of heavy whipping cream and add 1/4 cup of powdered sugar. Whip the cream on medium speed until stiff peaks form. This usually takes about 3-5 minutes.
Next, gently fold the whipped cream into the softened vanilla ice cream until fully combined. Be careful not to deflate the whipped cream too much; you want to keep the mixture light and airy.
Step 4: Assemble the Pie
Once the filling is ready, remove the crust from the refrigerator. Spoon the creamy filling into the prepared crust, spreading it evenly with a spatula. To add a touch of decadence, drizzle chocolate fudge sauce over the top of the filling before smoothing it out. If desired, reserve a bit of fudge sauce for drizzling on individual slices when serving.
Step 5: Chill the Pie
Cover the assembled pie with plastic wrap or aluminum foil and return it to the refrigerator. Chill for at least 4 hours, or overnight if possible, to allow the pie to set completely. This chilling time is crucial for ensuring the filling firms up and holds its shape when sliced.
Stay tuned for the next part of this recipe, where we’ll detail the finishing touches and serving suggestions to make your Oreo Delight truly unforgettable.
Detailed Explanation of the Preparation Process
Creating the perfect Oreo Delight requires attention to detail during each preparation step. This ensures a delectable dessert that is not only visually appealing but also bursting with flavor. Here’s how to master each component of this no-bake ice cream pie.
Preparing the Crust
The crust is the foundation of your Oreo Delight, and its quality can make or break the entire dessert. Start by finely crushing the Oreo cookies until they resemble a fine powder. This is crucial because larger chunks can lead to a crumbly texture that doesn’t hold together well when baked or chilled. You can use a food processor for this task; simply pulse the cookies until you achieve the desired consistency.
Once crushed, transfer the Oreo crumbs to a mixing bowl and combine them with melted butter. The butter acts as a binder, crucial for achieving a cohesive crust. Stir the mixture until all crumbs are evenly coated. The proper packing of the crust is paramount: use the back of a measuring cup or your fingers to press the mixture firmly into the pie dish, ensuring it adheres well and forms a solid base. A well-packed crust will prevent crumbling when serving and provide a satisfying crunch with each bite.
Making the Ice Cream Filling
The ice cream filling is the heart of the Oreo Delight, and achieving a smooth mixture is essential. Start by allowing your ice cream to soften at room temperature for about 15-20 minutes. This will make it easier to fold in the other ingredients without creating a lumpy texture.
In a large mixing bowl, combine the softened ice cream with any additional flavorings or ingredients you want to include—think crushed Oreos, chocolate syrup, or even a splash of vanilla extract for extra depth. The folding technique is crucial here: use a spatula to gently incorporate the ingredients. Start by cutting through the center of the mixture, then lift from the bottom and fold over the top. Repeat this motion until everything is well combined, being careful not to overmix, which can lead to a denser texture.
Whipping the Cream
For the topping, whipping cream is essential to create a light and fluffy texture. Begin with cold heavy cream, as this helps achieve better volume when whipping. Using an electric mixer, beat the cream on medium speed until it begins to thicken. Gradually add powdered sugar and vanilla extract to sweeten the cream and enhance its flavor. Continue whipping until soft peaks form—this means that when you lift the beaters, the cream will hold its shape but still be smooth and spreadable.
Be cautious not to overwhip; if you whip too long, the cream can turn grainy and eventually become butter. Once whipped to perfection, set it aside while you assemble the pie.
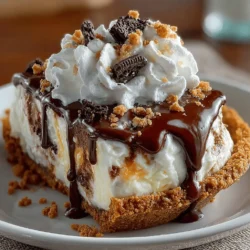
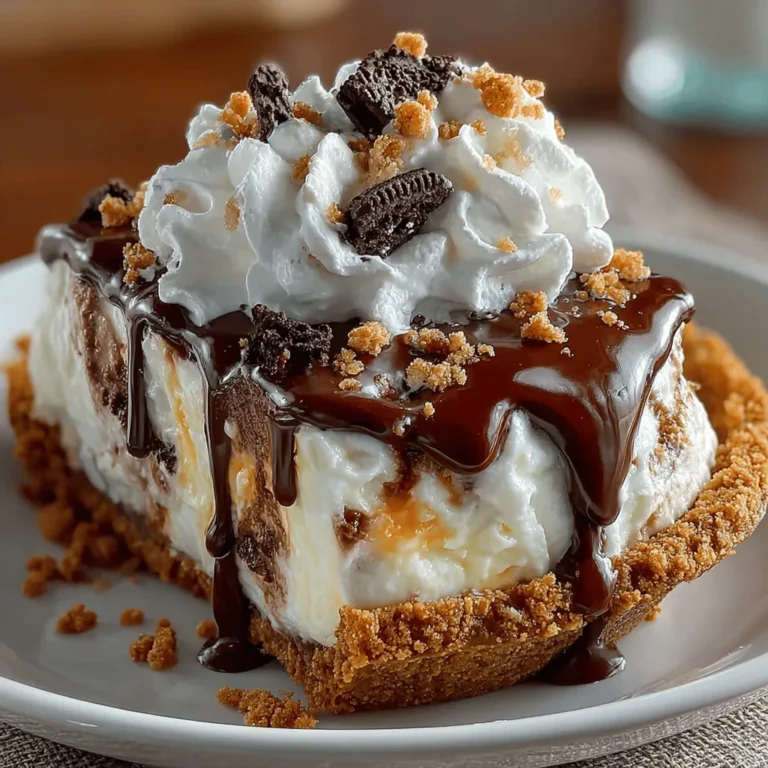
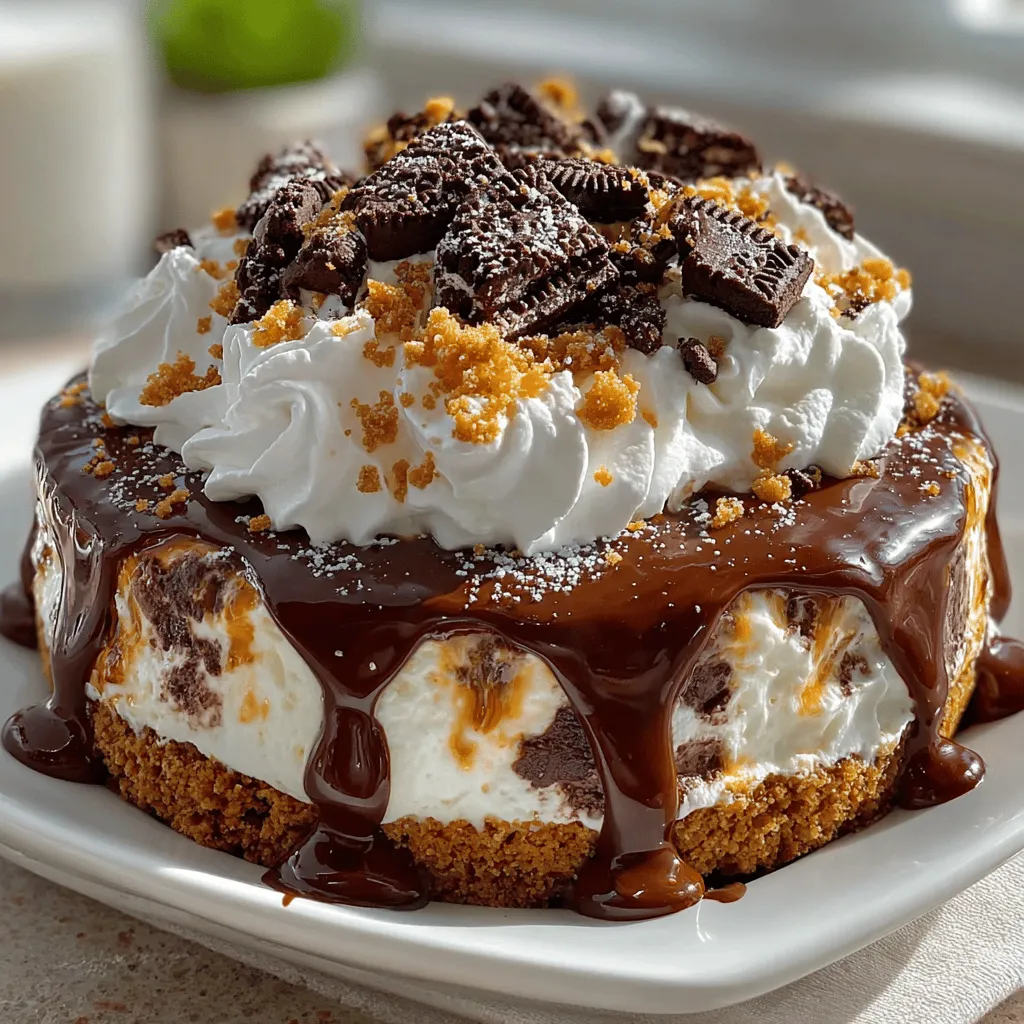
Assembling the Pie
Assembling your Oreo Delight is where the fun begins. Start by spreading the ice cream filling evenly over your prepared crust. Use an offset spatula or the back of a spoon to smooth out the filling, ensuring it reaches all edges of the crust. This will not only make for a beautiful presentation but also ensure that every slice has a balanced amount of crust and filling.
Once the filling is spread evenly, top with the freshly whipped cream, again smoothing it out to create an even layer. For an artistic touch, you might consider using a piping bag with a star tip to create decorative swirls on top.
After the whipped cream is in place, it’s time for garnishing. Crushed Oreos, chocolate shavings, or even drizzles of chocolate syrup can elevate the visual appeal of your pie. These final touches not only look great but also enhance the flavor with added texture and sweetness.
Chilling the Pie
Patience is key when it comes to chilling your pie. Once assembled, cover the pie with plastic wrap and place it in the freezer. It’s best to chill the pie for at least 4-6 hours or overnight if you can wait. This allows the flavors to meld beautifully, and the pie will set to the perfect texture. A well-chilled pie will slice cleanly, while a pie that hasn’t chilled long enough may be too soft and challenging to serve.
Flavor Pairings and Serving Suggestions
Oreo Delight is versatile and pairs well with various flavors and beverages. Here’s how you can enhance your serving experience.
Exploration of Flavors That Complement Oreo Delight
The classic flavor of Oreo pairs beautifully with many options. Consider serving your pie alongside a rich chocolate milkshake, which echoes the chocolatey notes of the Oreos. Alternatively, a cup of freshly brewed coffee or espresso can provide a delightful contrast to the sweetness of the pie, making for an indulgent dessert experience.
Ideas for Serving
When it comes to serving Oreo Delight, presentation is key. You can serve slices on individual plates for a formal gathering or scoop portions into bowls for a cozy family night. For a more festive touch, consider using dessert platters, allowing guests to help themselves.
If you want to elevate the experience, create a dessert platter featuring the Oreo Delight, fresh fruits like strawberries or raspberries, and a selection of cookies or brownies for variety.
Alternative Toppings or Variations
The beauty of Oreo Delight is its adaptability. While the classic version is delicious, you can experiment with different ice cream flavors, such as cookies and cream, mint chocolate chip, or even strawberry for a fruity twist.
For added texture and flavor, consider incorporating toppings like colorful sprinkles, crushed nuts, or fresh fruit. You might also drizzle caramel or chocolate sauce for an extra sweet touch. Each variation can create a new dessert experience, keeping your Oreo Delight exciting every time you make it.
Nutritional Information and Portion Control
While indulging in a dessert like Oreo Delight, it’s important to be mindful of nutritional aspects.
Overview of Nutritional Aspects
A typical slice of Oreo Delight contains ingredients that contribute to its rich flavor, including cream, sugar, and cookies. While it’s a treat meant for enjoyment, understanding portion sizes can help you savor it without overindulging.
Discussion on Portion Sizes
Serving sizes can vary, but a standard slice is generally around 1/8 of the pie. This allows you to enjoy the rich flavors without consuming too many calories at once. Pairing your slice with a side of fruit can provide a refreshing contrast and help balance the sweetness.
Suggestions for Balancing Dessert with Healthier Choices
To enjoy Oreo Delight mindfully, consider balancing your dessert with healthier choices throughout the day. For example, if you plan to have a slice of this indulgent pie, you might opt for lighter meals earlier in the day, focusing on vegetables, lean proteins, and whole grains.
Additionally, incorporating physical activity into your daily routine can make occasional treats more enjoyable without guilt. Remember, dessert is meant to be a celebration, and enjoying it mindfully can enhance your overall experience.
Conclusion
Oreo Delight is an easy and delicious no-bake dessert that truly shines at any gathering, offering a delightful combination of flavors and textures. Its simplicity makes it an ideal choice for busy bakers, while the opportunity for customization allows for personal creativity in the kitchen.
Whether you’re hosting a party or simply craving a sweet treat for family night, this pie is sure to impress. Don’t hesitate to explore variations and personal touches that will make this dessert uniquely yours. The joy of creating and sharing Oreo Delight is what makes it a cherished recipe in any dessert lover’s collection. So gather your ingredients and get ready to treat yourself and your loved ones to a slice of this delightful no-bake ice cream pie!