
Choco Eruption Delight: A Molten Chocolate Cake Recipe
Indulging in a dessert that combines rich chocolate with a gooey center is a dream for many chocolate lovers, and the Choco Eruption Delight is here to make that dream a reality. This decadent molten chocolate cake promises to satisfy your sweet tooth and impress your guests with its luscious, flowing center. With simple ingredients and straightforward steps, you can create a restaurant-quality dessert that bursts with flavor. This article will guide you through the recipe in detail, including the origins of molten cakes, the science behind their texture, and tips for achieving the perfect eruption every time.
The Allure of Molten Chocolate Cake
The molten chocolate cake, often referred to as lava cake, has captivated dessert enthusiasts since its inception. The history of this delightful treat can be traced back to the 1980s, when French chef Jean-Georges Vongerichten is credited with developing the first version. The concept behind this dessert was revolutionary: a cake that appeared solid on the outside but revealed a molten chocolate center when cut into. This innovative approach quickly caught the attention of diners and chefs alike, leading to its rise in popularity across fine dining establishments.
From its humble beginnings in French kitchens, the molten chocolate cake has undergone a culinary journey that has seen it embraced by restaurants and home bakers around the world. Its allure lies not only in its rich flavor but also in the theatrical experience of cutting into the cake and watching the chocolate flow out. This visual appeal, combined with the heavenly taste of warm chocolate, makes it a favorite choice for special occasions, romantic dinners, and celebrations.
The beauty of molten cakes lies in their versatility; they can be prepared in various ways, infused with different flavors, and tailored to suit dietary preferences. Despite the evolution of dessert trends, molten chocolate cake remains a steadfast favorite, continuously delighting chocolate lovers with its indulgent nature.
Understanding the Ingredients
Creating the perfect Choco Eruption Delight requires understanding the essential components that contribute to its rich flavor and unique texture. Here’s a breakdown of each ingredient’s role in the recipe:
1. High-Quality Dark Chocolate: The star of the show, dark chocolate, provides the rich, intense flavor that defines this dessert. Opting for high-quality chocolate (70% cocoa or higher) not only enhances the taste but also contributes to the smooth, silky texture of the molten center. The chocolate should be free from additives and preservatives for the best results.
2. Unsalted Butter: This ingredient adds richness to the cake, helping to create a tender crumb. Using unsalted butter allows for better control over the overall saltiness of the dish, letting the chocolate flavor shine through.
3. Eggs: Eggs play a crucial role in binding the ingredients together and providing structure to the cake. They also help create the desired airy texture, contributing to the cake’s rise during baking.
4. Sugar: Sugar adds sweetness, balancing the richness of the chocolate and butter. It also helps in achieving the perfect crust on the outside of the cake, giving it that signature texture.
5. Flour: A small amount of flour is used to provide just enough structure to the cake while allowing the center to remain molten. The right balance is crucial; too much flour can lead to a dry cake, while too little can prevent it from holding its shape.
6. Vanilla Extract: A splash of vanilla enhances the overall flavor profile, making the chocolate taste even richer and more complex.
These ingredients work harmoniously to create a dessert that is not only delicious but also visually stunning. For those with dietary restrictions, variations of the Choco Eruption Delight can be made, such as gluten-free options using almond flour or dairy-free versions substituting butter with coconut oil or vegan butters.
Step-by-Step Breakdown of the Recipe
Now that we understand the ingredients, it’s time to prep your kitchen for success. Proper preparation is key to a seamless baking experience, and that starts with mise en place—having all your ingredients measured and ready to go before you begin.
Prepping Your Kitchen for Success
1. Gather the Right Tools: To create the Choco Eruption Delight, you will need the following kitchen tools:
– Ramekins or a muffin tin (for individual cakes)
– Mixing bowls
– A microwave-safe bowl or double boiler (for melting chocolate)
– Whisk or electric mixer
– Spatula
– Baking tray (for easy handling of hot ramekins)
2. Preheat Your Oven: Set your oven to 425°F (220°C) to ensure it is hot and ready when your batter is complete. A properly preheated oven helps achieve the desired molten texture.
3. Prepare the Ramekins: Lightly grease your ramekins or muffin tin with butter or cooking spray and dust them with cocoa powder. This not only prevents sticking but also adds an extra layer of chocolate flavor to the cake.
Perfecting the Cake Batter
Now that your kitchen is prepped, it’s time to dive into making the cake batter. The melting of chocolate and butter is a critical step that requires attention to detail.
1. Melting Chocolate and Butter: In a microwave-safe bowl or double boiler, combine the chopped dark chocolate and unsalted butter. If using a microwave, heat in 30-second intervals, stirring in between until the mixture is smooth and fully melted. If using a double boiler, ensure that the water does not touch the bottom of the bowl and stir continuously until melted. Be careful not to overheat the chocolate, as it can seize and become unusable.
2. Combining the Mixture: Once melted, remove the bowl from heat and allow it to cool slightly. In a separate mixing bowl, whisk together the eggs and sugar until the mixture is pale and fluffy. This should take about 3-5 minutes with an electric mixer. The air incorporated during this step is essential for creating a light texture.
3. Incorporate Chocolate: Gradually pour the cooled melted chocolate and butter mixture into the egg and sugar mixture, gently folding with a spatula until combined. Take care not to deflate the batter too much; the goal is to keep it light and airy.
4. Add Flour and Vanilla: Sift in the flour and add the vanilla extract, folding gently until just combined. The batter should be smooth and glossy, with no visible flour streaks.
With the batter prepared, you are now ready to pour it into your prepared ramekins or muffin tin. This is just the beginning of your journey to creating the Choco Eruption Delight, a dessert that promises to be as delightful to serve as it is to eat.
As we move forward in this article, we will explore the baking process, tips for achieving the perfect eruption, and how to serve this luxurious dessert to impress your guests. Stay tuned for the continuation of this chocolate-filled adventure!
Tips for Achieving the Right Consistency When Mixing
To create the perfect Choco Eruption Delight, achieving the right consistency during the mixing process is crucial. Here are some tips to ensure your batter is just right:
1. Use Room Temperature Ingredients: Ensure that your eggs and butter are at room temperature before mixing. This helps them blend smoothly and evenly, preventing lumps and achieving a silky batter.
2. Melt Chocolate Properly: When melting your chocolate, do so gently either using a double boiler or in short bursts in the microwave, stirring frequently. Overheating chocolate can cause it to seize, leading to a gritty texture.
3. Sift Dry Ingredients: Sifting your flour and cocoa powder before adding them to the wet ingredients helps to aerate them, resulting in a lighter batter. This is essential for achieving the desired texture of the cake.
4. Fold, Don’t Stir: When combining your dry ingredients with the wet, gently fold them together using a spatula. This technique helps incorporate air without overmixing, which can lead to a dense cake.
5. Check Consistency: The batter should be thick yet pourable. If it appears too thick, you can add a tablespoon of milk or water to reach the desired consistency, but be cautious not to add too much.
The Role of Eggs in Creating the Molten Texture
Eggs are a fundamental component in the Choco Eruption Delight recipe, playing a vital role in achieving the signature molten center. Here’s how eggs contribute to the overall structure and texture:
1. Binding Agent: Eggs act as a binding agent, helping to hold the ingredients together. This is essential for creating the structure of the cake while allowing for a gooey center.
2. Air Incorporation: Beating the eggs (especially the whites) introduces air into the batter. This makes the cake rise during baking, creating a delicate outer layer that holds the molten chocolate inside.
3. Moisture Source: Eggs add moisture to the batter, which is essential for the gooey texture. They also help in creating a rich flavor profile that complements the intense chocolate.
4. Coagulation: As the cake bakes, the proteins in the eggs coagulate, forming a structure that allows the outer part to set while keeping the center soft and indulgent.
Filling and Baking the Ramekins
Techniques for Filling Ramekins Correctly
Filling ramekins correctly is crucial for ensuring that each portion of your Choco Eruption Delight bakes evenly. Here are some techniques:
1. Grease the Ramekins: Begin by thoroughly greasing your ramekins with butter, followed by a dusting of cocoa powder. This not only prevents sticking but also adds an extra layer of chocolate flavor.
2. Use a Piping Bag: To avoid spills and ensure even distribution, consider using a piping bag to fill your ramekins. This method allows for precise control over the amount of batter in each dish.
3. Leave Space for Expansion: Fill each ramekin about three-quarters full. This allows room for the cake to rise without overflowing.
Understanding Baking Times and Visual Cues for Doneness
Baking times can vary based on your oven and the size of your ramekins. Here’s what to look for to determine doneness:
1. Standard Baking Time: Generally, Choco Eruption Delights bake for about 12-14 minutes. However, start checking for doneness at the 10-minute mark.
2. Visual Cues: The edges should be set, while the center will appear soft and slightly jiggly. If the top springs back when lightly pressed, it’s a good sign that the outer layer is set.
3. Toothpick Test: Insert a toothpick into the center of the cake; it should come out with some moist batter clinging to it, indicating the molten center.
How Temperature Influences the Molten Center
The temperature at which you bake your Choco Eruption Delight is critical for achieving the desired gooey center. Here are key points to consider:
1. Oven Temperature: Preheat your oven to 425°F (220°C). This high temperature allows the outside of the cake to set quickly while keeping the center molten.
2. Chilling the Batter: For an even more molten center, consider chilling your filled ramekins in the refrigerator for about 30 minutes before baking. This can help control the baking process and ensure a gooey interior.
3. Cooling Period: Allow the cakes to cool in the ramekins for a minute before inverting. This helps maintain the molten texture, as it continues to cook slightly from residual heat.
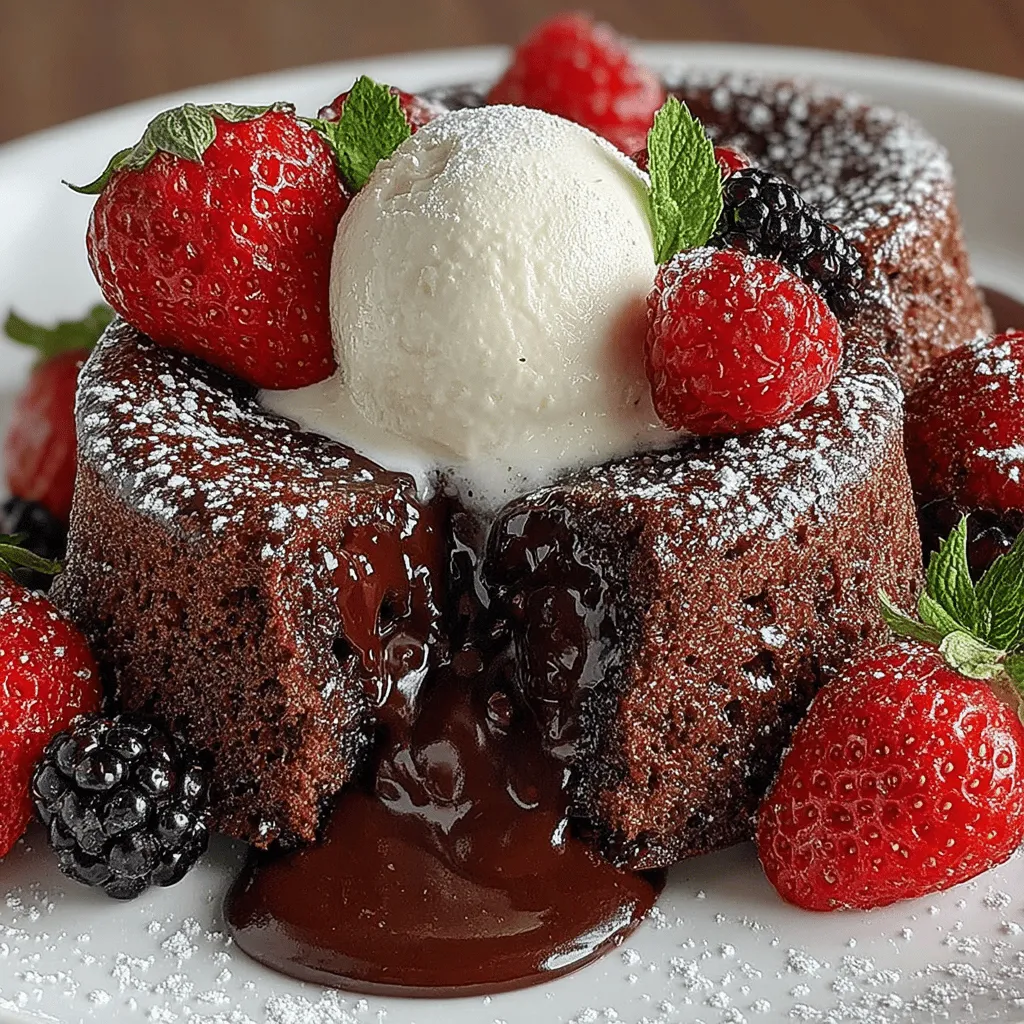
Serving Suggestions for Maximum Enjoyment
Now that your Choco Eruption Delight is perfectly baked, it’s time to serve it up for maximum enjoyment. Here are some suggestions:
Garnishing Your Choco Eruption Delight
Garnishing can elevate your dessert both in flavor and presentation. Consider these ideas:
1. Fresh Berries: Top your molten cake with fresh raspberries or strawberries. Their tartness beautifully contrasts the rich chocolate.
2. Powdered Sugar: A light dusting of powdered sugar adds elegance and a sweet touch that complements the deep chocolate flavor.
3. Chocolate Sauce: Drizzle warm chocolate sauce over each serving for an extra indulgent experience.
Pairing Recommendations: Why Vanilla Ice Cream Complements the Dish
One of the best ways to enjoy your Choco Eruption Delight is by pairing it with vanilla ice cream. Here’s why:
1. Temperature Contrast: The cold creamy texture of ice cream balances the warm molten cake, creating a delightful sensory experience.
2. Flavor Harmony: Vanilla’s subtle sweetness complements the intense chocolate flavor, enhancing the overall dessert without overpowering it.
3. Texture Variety: The combination of smooth ice cream and the gooey center provides a wonderful contrast in textures that is sure to impress.
Creative Ways to Incorporate Seasonal Fruits for Garnish
Seasonal fruits can add a refreshing twist to your dessert. Here are some ideas:
1. Citrus Segments: Use orange or grapefruit segments for a bright, zesty contrast that cuts through the richness of the chocolate.
2. Stone Fruits: Grilled peaches or nectarines in the summer can add a smoky sweetness that pairs well with chocolate.
3. Autumn Fruits: In the fall, consider poached pears or apples for a warm, comforting garnish that enhances the flavors of chocolate.
The Science Behind the Molten Center
Understanding the science behind the Choco Eruption Delight can help you master this recipe. Here’s how temperature and baking time create the perfect eruption:
The Chemistry of Chocolate and How It Behaves When Heated
1. Melting Point: Chocolate begins to melt at around 90°F (32°C). As it heats, the cocoa butter separates from the cocoa solids, allowing it to flow and create that indulgent molten center.
2. Emulsification: The fat in chocolate helps to emulsify the batter, creating a smooth consistency that contributes to the overall texture of the dessert.
The Balance Between Baking Time and Molten Consistency
1. Timing is Key: The balance between underbaking and overbaking is crucial. Too little time results in a jiggly mess, while too much will set the center completely.
2. Trial and Error: Don’t be afraid to experiment with baking times based on your oven’s quirks. Keep a log of your findings to perfect your technique.
Common Pitfalls to Avoid for a Successful Outcome
1. Overmixing the Batter: This can lead to a dense texture instead of a light, airy cake. Always fold gently to maintain the batter’s integrity.
2. Inaccurate Oven Temperature: An oven thermometer is a handy tool to ensure your temperature is accurate, as many ovens can be off by several degrees.
3. Skipping the Greasing Step: Properly greasing ramekins is essential to prevent sticking, ensuring the cakes release perfectly for that dramatic eruption effect.
Conclusion
The Choco Eruption Delight is not just a dessert; it’s an experience that encapsulates the joy of chocolate in its most indulgent form. By understanding the origins, ingredients, and techniques involved, you can master this recipe and create a show-stopping finish to any meal. Whether served at a dinner party or enjoyed as a personal treat, this molten cake is sure to leave a lasting impression.
As you perfect your Choco Eruption Delight, remember that experimentation is part of the journey. Embrace the process, and soon you’ll be delighting your friends and family with this exquisite dessert that truly embodies the spirit of culinary creativity. Enjoy every moment of baking, serving, and indulging in this heavenly treat!