Delightful Choco-Banana Bliss Pops: A Sweet Treat for Everyone
Introduction
Banana-based desserts have long captured the hearts and taste buds of dessert lovers around the world. Their natural sweetness, paired with the health benefits they offer, makes bananas a go-to ingredient for many recipes. Rich in essential vitamins, minerals, and dietary fiber, bananas are not only delicious but also contribute to overall well-being. This delightful combination of health and flavor is what makes Choco-Banana Bliss Pops a standout treat for people of all ages.
Choco-Banana Bliss Pops are more than just a dessert; they are a fun and easy way to enjoy a sweet snack. Whether you’re looking for a quick after-school treat for the kids, a refreshing dessert for a summer gathering, or a guilt-free indulgence for yourself, these pops are the perfect solution. The appeal of Choco-Banana Bliss Pops lies in their simplicity and versatility. Made with wholesome ingredients that are easy to find, they can be customized to suit various tastes and dietary preferences.
In this article, we will explore the delightful world of Choco-Banana Bliss Pops, starting with an overview of the ingredients that make this recipe both flavorful and nutritious. We’ll also provide a step-by-step guide to creating these delicious treats at home, ensuring that you can enjoy this sweet experience with family and friends.
Understanding the Ingredients
Before diving into the recipe, it’s essential to understand the key ingredients that make up Choco-Banana Bliss Pops. Each component contributes to the overall flavor, texture, and health benefits of this delightful treat.
Bananas are the star of this dessert. Not only do they provide a natural sweetness, but they also offer a plethora of health benefits. Packed with potassium, vitamin C, vitamin B6, and dietary fiber, bananas are a nutritious choice that can aid in digestion and provide a quick energy boost. When choosing bananas for this recipe, it’s important to select ones that are just ripe enough. A banana that is slightly speckled will offer the perfect balance of sweetness and texture.
Chocolate is another integral part of Choco-Banana Bliss Pops. It adds a rich, indulgent flavor that pairs beautifully with the natural sweetness of bananas. For this recipe, semi-sweet chocolate chips are the ideal choice. They strike the perfect balance between sweetness and cocoa flavor, ensuring that the chocolate coating complements rather than overpowers the bananas. Moreover, using high-quality chocolate can elevate the overall taste of your pops.
Coconut oil plays a supporting role in this recipe. When melted and mixed with chocolate, it helps create a smooth coating that adheres well to the frozen bananas. Coconut oil also adds a subtle flavor and contributes to a glossy finish, enhancing the pops’ visual appeal. Its health benefits, including healthy fats and potential anti-inflammatory properties, make it a great addition to this dessert.
To add texture and crunch, nuts and shredded coconut can be incorporated into the final coating. Nuts, such as chopped almonds or walnuts, provide a satisfying crunch and additional nutrients, including protein and healthy fats. Shredded coconut, on the other hand, introduces a tropical flair and a chewy texture that contrasts beautifully with the smooth chocolate and creamy banana.
For those looking to add an extra element of fun, mini marshmallows can be included as an optional ingredient. These little bites of sweetness can enhance the overall taste and appearance of the pops, making them even more appealing to children and those young at heart.
Step-by-Step Guide to Making Choco-Banana Bliss Pops
Now that we’ve explored the ingredients, let’s move on to the fun part—making Choco-Banana Bliss Pops! This straightforward recipe involves a few simple steps that anyone can follow to create delicious pops at home.
Preparation of Bananas
The first step in making Choco-Banana Bliss Pops is to prepare your bananas. Start by selecting ripe bananas, as they will be sweeter and easier to work with. Peel the bananas carefully, ensuring not to bruise the fruit. Once peeled, cut each banana into halves or thirds, depending on your preferred size for the pops. Smaller pieces are perfect for kids, while larger ones can be enjoyed by adults.
Next, insert a wooden stick or popsicle stick into one end of each banana piece. Make sure the stick goes in far enough to provide stability but be careful not to push it through the other end. This stick will serve as a handle for your pops, making them easy to hold and eat.
Freezing the Bananas
Once your bananas are prepared, it’s time to freeze them. Freezing is a crucial step, as it creates a firmer texture that will hold up during the coating process. Place the banana pieces on a baking sheet lined with parchment paper, ensuring they are spaced apart so they do not stick together.
For optimal results, freeze the bananas for at least 2 to 3 hours, or until they are completely firm. This will ensure that when you dip them in chocolate, they won’t become mushy. Once frozen, the bananas are ready for the next step.
Melting the Chocolate
While the bananas are freezing, you can prepare the chocolate coating. Start by placing semi-sweet chocolate chips in a microwave-safe bowl. To melt the chocolate safely, heat it in the microwave in 30-second intervals, stirring in between. This method helps to avoid overheating the chocolate, which can lead to a grainy texture.
Once the chocolate is nearly melted, add a tablespoon of coconut oil to the bowl. The coconut oil not only adds a subtle flavor but also helps to create a silky-smooth consistency that will coat the bananas beautifully. Stir the mixture until the chocolate and coconut oil are fully combined and smooth.
Preparing the Topping Mixture
While the chocolate is melting, this is the perfect time to prepare your topping mixture. In a separate bowl, combine your choice of chopped nuts, shredded coconut, and mini marshmallows (if using). This mixture will add texture and extra flavor to your Choco-Banana Bliss Pops, making them even more irresistible.
With your bananas frozen, chocolate melted, and toppings ready, you’re all set to bring your Choco-Banana Bliss Pops to life! In the next part of this article, we will walk through the final steps of coating your pops and adding those delicious toppings to create a truly delightful treat. Stay tuned for the continuation of this sweet journey!
The Significance of Mixing Nuts, Coconut, and Optional Marshmallows
When it comes to creating the perfect coating for your Choco-Banana Bliss Pops, the combination of nuts, coconut, and optional marshmallows plays a vital role in enhancing both flavor and texture. Nuts add a delightful crunch and a rich, satisfying taste that complements the creaminess of the bananas and the sweetness of the chocolate.
Coconut, whether shredded or in flake form, contributes a tropical flair and chewiness that balances the other components. It also provides healthy fats that help keep you feeling full. For those with a sweet tooth, adding mini marshmallows can introduce an extra layer of sweetness and a fun texture. This mix not only makes your pops visually appealing but also elevates the overall experience with diverse mouthfeel and flavors.
Nutritional Benefits of Using Different Types of Nuts
Incorporating nuts into your Choco-Banana Bliss Pops not only enhances their taste but also packs a nutritional punch. Here are some of the most popular choices and their benefits:
– Almonds: Rich in vitamin E, fiber, and protein, almonds are known to promote heart health and may help regulate blood sugar levels.
– Walnuts: A great source of omega-3 fatty acids, walnuts can support brain health and reduce inflammation.
– Pistachios: Low in calories yet high in protein, pistachios contain antioxidants that may help lower cholesterol levels.
– Cashews: Loaded with zinc and magnesium, cashews support immune function and bone health.
By mixing different types of nuts, you’re not just enhancing the flavor profile but also providing a variety of nutrients that contribute to a balanced diet.
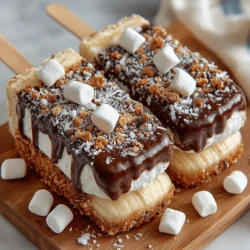
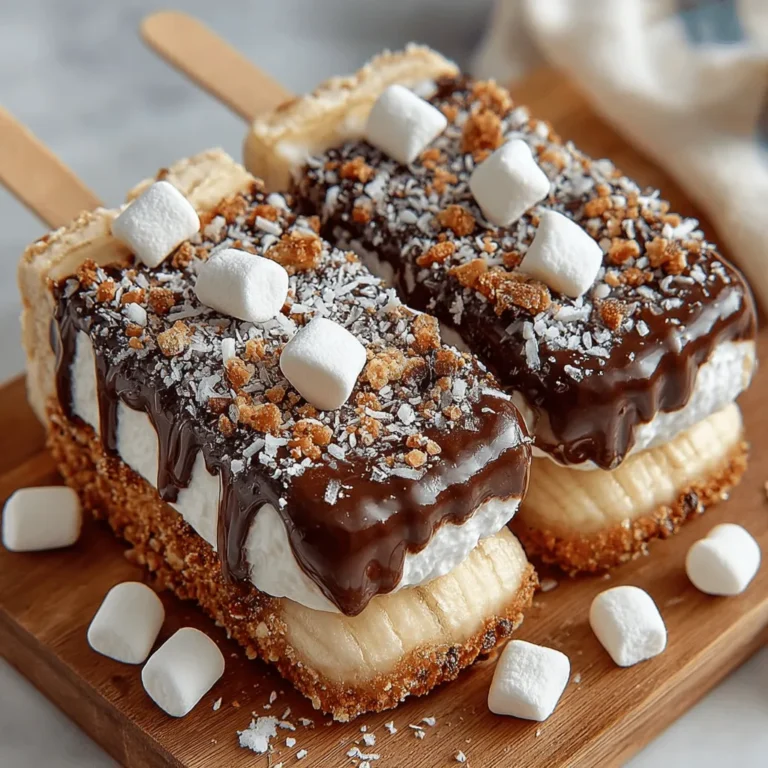
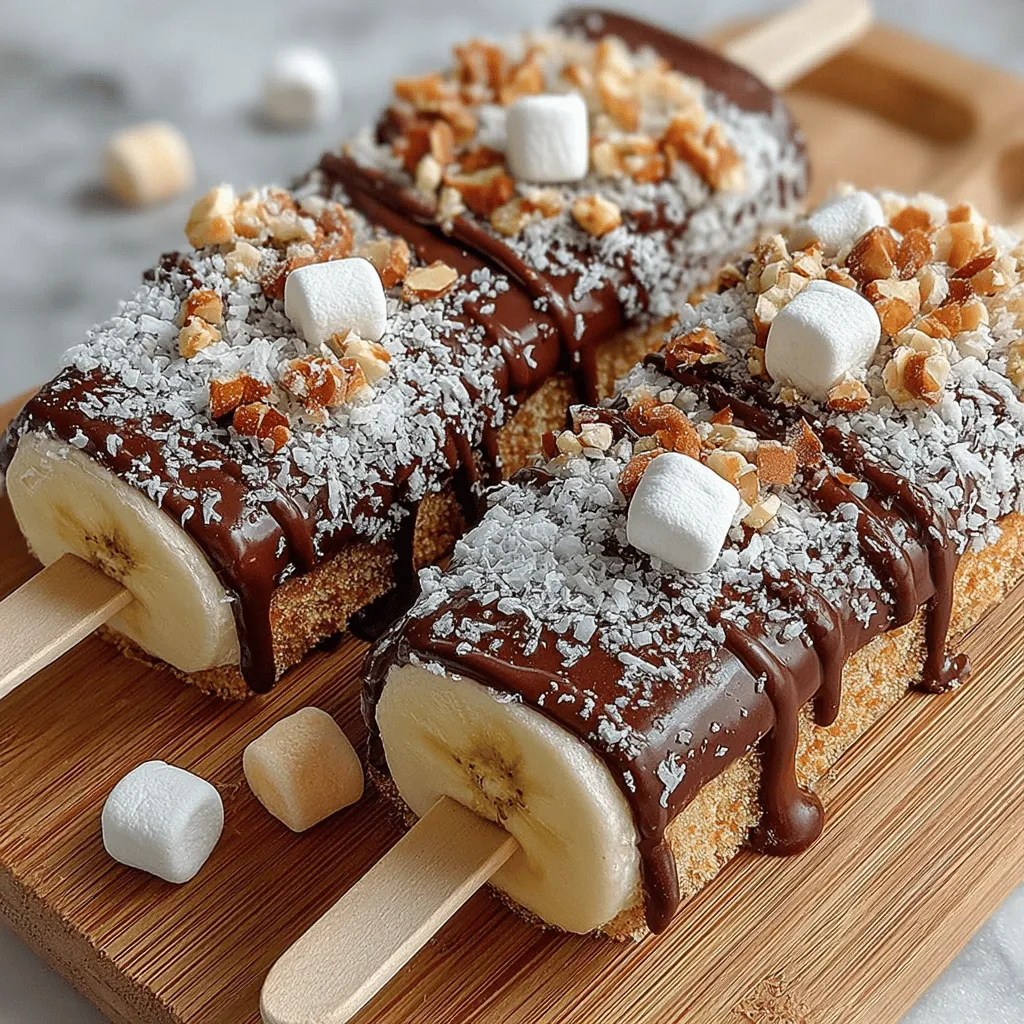
Coating the Banana Pops
The art of coating your banana pops is key to achieving delicious, evenly coated treats. Here’s a step-by-step guide to ensure your Choco-Banana Bliss Pops are perfectly covered:
1. Preparation: After melting your chocolate, set up a station that includes your toppings (nuts, coconut, and marshmallows) in shallow bowls.
2. Dipping: One by one, take each frozen banana pop and dip it into the melted chocolate. Ensure the banana is fully submerged, and use a spoon to help coat any areas that aren’t covered.
3. Toppings: After dipping, immediately roll or sprinkle your chosen toppings over the chocolate-covered banana. This is crucial because the chocolate will begin to harden quickly, and toppings need to adhere to it while still wet.
4. Timing: Work quickly! Aim to coat and top each banana pop immediately after dipping. If the chocolate starts to harden before you can add your toppings, it will be more challenging for them to stick.
Final Freezing Process
Once your banana pops are coated and topped, it’s time for the final freezing process. This step is essential for ensuring that the coating sets properly, leading to a delightful eating experience.
1. Setting: Place the coated pops back on the parchment-lined baking sheet. Ensure they are spaced apart to avoid sticking together.
2. Freezing: Return the pops to the freezer for at least 30 minutes. This allows the chocolate to harden completely, creating a satisfying crunch when you bite into it.
3. Storage: Once frozen, transfer the pops into an airtight container or a zip-top bag. Make sure to separate layers with parchment paper to prevent sticking. Store them in the freezer for up to two weeks for optimal freshness.
Nutritional Information
Understanding the nutritional profile of your Choco-Banana Bliss Pops can help you enjoy them guilt-free. Here’s a breakdown of the components per serving (assuming one pop):
– Calories: Approximately 150-200 calories, depending on the toppings used.
– Total Fat: 8-10 grams (from nuts and chocolate).
– Saturated Fat: 4-5 grams (mainly from chocolate).
– Carbohydrates: 20-25 grams.
– Fiber: 2-3 grams.
– Protein: 2-4 grams.
Comparison of Health Benefits Between Traditional Popsicles and Choco-Banana Bliss Pops
Traditional popsicles are often loaded with refined sugars and artificial flavors, providing little nutritional value. In contrast, Choco-Banana Bliss Pops offer a wholesome alternative, combining the natural sweetness of bananas with the health benefits of nuts and coconut. This makes them a more satisfying snack option that can help keep those hunger pangs at bay.
Discussion on Portion Control and Indulgence in a Healthier Way
One of the great advantages of making Choco-Banana Bliss Pops at home is the ability to control portion sizes. By using bananas as the base, you’re naturally limiting the amount of added sugars and unhealthy fats compared to store-bought ice creams or pops. Enjoying a single pop can feel indulgent while still being a healthier choice, allowing you to satisfy your sweet tooth without overindulging.
Creative Variations and Customizations
To elevate your Choco-Banana Bliss Pops even further, consider these creative variations and customizations:
– Ingredient Substitutions: For a vegan option, use dairy-free chocolate or dark chocolate with a high cocoa content. You can also substitute traditional nuts with seeds like sunflower or pumpkin seeds for a nut-free version.
– Additional Toppings: Explore other toppings like colorful sprinkles, chia seeds, or finely crushed granola for added texture. Different nut combinations can create unique flavor profiles, such as using hazelnuts for a chocolate-hazelnut treat.
– Flavor Combinations: For an extra kick, try adding a sprinkle of cinnamon or a splash of vanilla extract to the melted chocolate. You can experiment with flavored chocolates like orange or mint for a refreshing twist.
Occasions to Serve Choco-Banana Bliss Pops
Choco-Banana Bliss Pops are versatile treats perfect for various occasions:
– Summer Gatherings: Serve them at backyard barbecues or pool parties as a cool, refreshing treat that everyone can enjoy.
– Birthday Parties: Kids will love these pops as a fun, healthy alternative to traditional ice cream cakes.
– Healthy Snacks: They make for a great after-school snack or a post-workout treat, keeping energy levels up without unhealthy sugars.
Additionally, making these pops can be a fun, interactive activity for kids. Let them choose their own toppings and help with the dipping process, making it a memorable kitchen experience.
Conclusion
Making Choco-Banana Bliss Pops at home is not only a fun and rewarding experience but also a way to enjoy a delicious treat that brings family and friends together. These pops are packed with nutrients, offering a healthier alternative to traditional frozen desserts. With endless possibilities for customization and creativity, every batch can be a new adventure in flavor.
We encourage you to experiment with the recipe, share your delightful results with others, and enjoy the simple pleasure of creating these delightful treats. Whether for a special occasion or just a regular snack, Choco-Banana Bliss Pops are bound to be a hit!